


Simple Steps to a DIY No-Sew Pencil Pouch You'll Love

TL;DR
Creating your own DIY no-sew pencil pouch is a fun and simple craft project perfect for anyone. You don't need a sewing machine—just some durable fabric like felt or canvas, a strong adhesive like fabric glue or permanent hem bonding strips, and a closure. In just a few easy steps, you can craft a custom, stylish case for your pens, pencils, or makeup brushes without a single stitch.
Essential Materials and Tools for Your No-Sew Project
Before you jump into making your pencil pouch, gathering all your supplies will make the process smooth and enjoyable. The great news is that you only need a handful of common and affordable craft materials. Most of these can be found at your local craft store or online. Having everything laid out and ready to go ensures your project comes together perfectly without any last-minute scrambling.
The core components of your no-sew pouch are the fabric, the adhesive, and the closure. The fabric you choose will determine the look and durability of your final product, while the adhesive is the magic that holds it all together. From zippers to buttons, the closure adds the finishing touch that keeps your supplies secure. Let's break down exactly what you'll need.
Fabric: Sturdier fabrics work best to ensure your pouch lasts. Great options include duck cloth, canvas, felt, or even natural jute/burlap for a rustic look. A piece measuring around 10x12 inches is a good starting point for a standard-sized pouch.
Adhesive: This is the most crucial part of a no-sew project. You have two excellent choices. Fabric glue provides a strong, permanent bond that's great for seams. Alternatively, permanent hem bonding strips, like those mentioned in a tutorial from I SPY DIY, offer a clean, no-mess application with no drying time.
Closure: You can use a standard 9-inch zipper for a classic, secure pouch, as seen in a guide by Make Life Lovely. For a different style, a simple button and string loop works wonderfully, especially with felt projects.
Tools: You will need a good pair of fabric scissors for clean cuts, a ruler for accurate measurements, and a pen or fabric marker to outline your cuts.
While this guide focuses on creating a pouch from scratch, if you're planning a larger event or need promotional items, some companies specialize in pre-made solutions. For instance, if you're looking for wholesale or custom options, you can explore services for branded mesh pencil pouches that are ideal for corporate gifts or school functions. One such provider is Bincai International, which offers custom printing on bulk orders.
Step-by-Step Guide: Creating a Felt Pouch with Bonding Strips
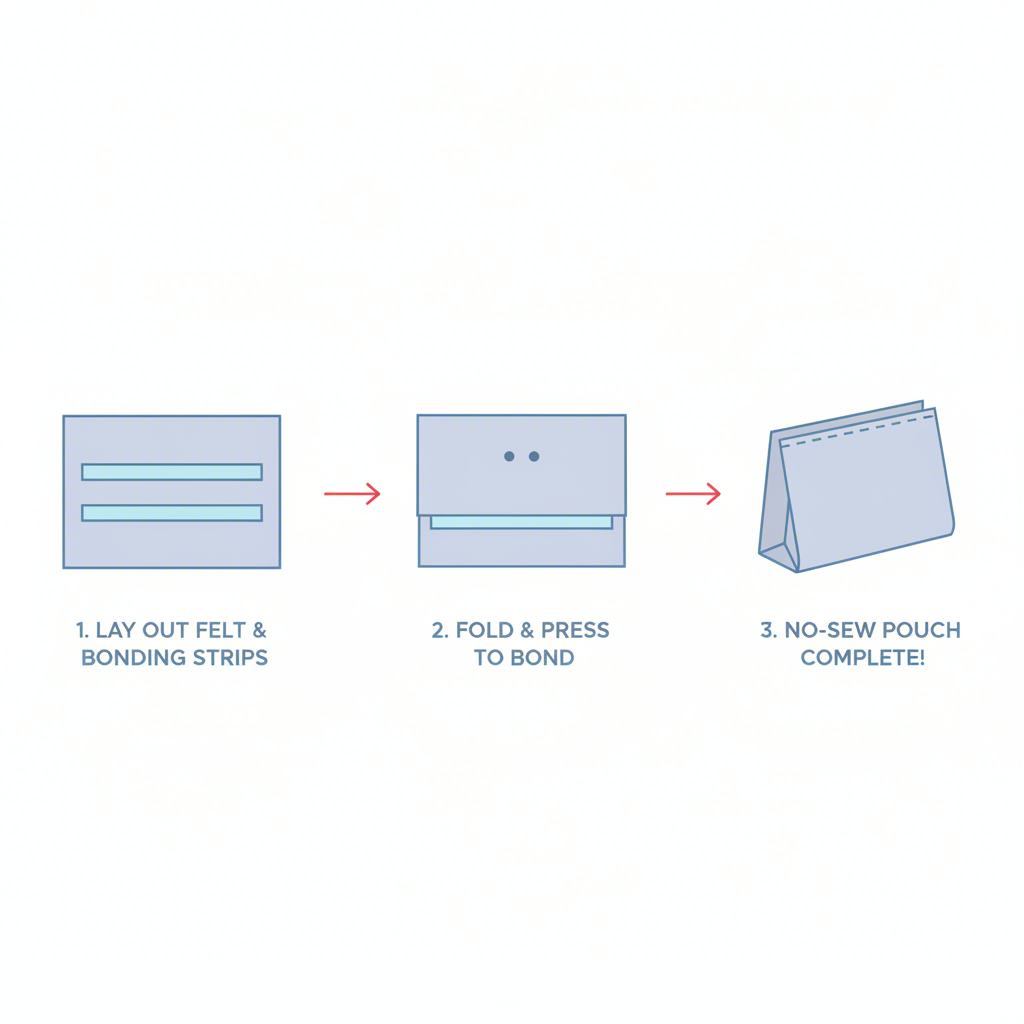
One of the easiest and cleanest ways to make a no-sew pencil pouch involves using felt and permanent hem bonding strips. This method is perfect for beginners because it doesn't require any drying time and results in crisp, neat edges. The felt is soft yet durable, and the bonding strips create an instant, powerful hold. This technique creates a stylish fold-over pouch with a charming button-and-loop closure.
The process involves layering a decorative outer fabric with a sturdy felt interior, using the bonding strips to seal the edges. It's an inventive technique that gives the pouch structure and a polished look without any complicated steps. Just follow these simple instructions to create your own felt pencil case.
Cut Your Pieces: Start by cutting your felt. You'll need two pieces: one main body rectangle (e.g., 8" by 3") and one top piece of the same size but with a triangle at the top to serve as the flap.
Prepare the Outer Fabric: Lay your decorative fabric face down and place the two felt pieces on top, lined up. Trace an outline on the fabric that is about a half-inch wider than the felt on all sides, then cut it out.
Attach the Closure Loop: Create a small loop with a piece of string and attach it to the tip of the felt triangle flap using a small piece of a bonding strip.
Assemble the Layers: With the felt pieces still in place on the fabric, apply bonding strips to the entire fabric border. Carefully fold the fabric border over onto the felt to secure the layers together.
Form the Pouch: Fold the bottom half of the pouch upward, stopping just below the triangular flap. Use more bonding strips to seal the left and right sides, creating the pocket. Do not apply adhesive to the top opening or the flap.
Add the Button: Attach your button to the front of the pouch, positioned so the string loop can fasten around it snugly. You can use an easy-fix button or a small amount of strong glue.
For this method to be successful, ensure you cut the bonding strips to size so they don't hang over the edges. Taking a moment to press the seams firmly after applying the strips will help create the strongest possible bond.
Alternative Method: The Fabric Glue & Zipper Pouch
If you prefer a more traditional and extra-secure pencil case, the fabric glue and zipper method is an excellent choice. This technique creates a durable pouch that looks very professional and is perfect for holding lots of supplies. While it requires a bit of patience for drying, the result is a sturdy and functional pouch that will stand up to daily use. This approach is detailed in a tutorial from Make Life Lovely, and a similar method is used by Your DIY Family, with fabrics like duck cloth and jute.
The key to this method is applying the fabric glue carefully and allowing it to cure completely. This ensures the seams are strong and the zipper functions smoothly. The process is straightforward and yields a fantastic result that you can be proud of.
Cut and Hem the Fabric: Cut your fabric into a rectangle (a 10" x 12" piece is a good size). On the two shorter sides (the 10" sides), fold and press a half-inch seam.
Attach the Zipper: Apply a thin, even line of fabric glue along one of the hemmed edges. Press this edge firmly onto the fabric part of the zipper. Repeat this process for the other hemmed edge on the opposite side of the zipper.
Let it Dry: Allow the glue to dry completely, which typically takes a couple of hours. This step is crucial for a strong bond.
Glue the Sides: Once dry, open the zipper halfway and turn the pouch inside out. Apply a line of fabric glue along the open right and left edges to seal the sides of the pouch.
Final Drying: Press the sides together firmly and let the glue dry for another two hours.
Turn and Finish: After the side seams have fully dried, turn the bag right side out through the partially opened zipper. Your zippered pouch is now complete!
To ensure your project is a success, here are a few pro tips:
When gluing the zipper, be very careful not to get any adhesive on the zipper teeth, as this could prevent it from opening and closing.
Opening the zipper partway before gluing the sides is essential. If you glue it shut, you won't be able to turn the pouch right side out.
Use clips or heavy books to hold the seams together while the glue dries to create a stronger, more even bond.
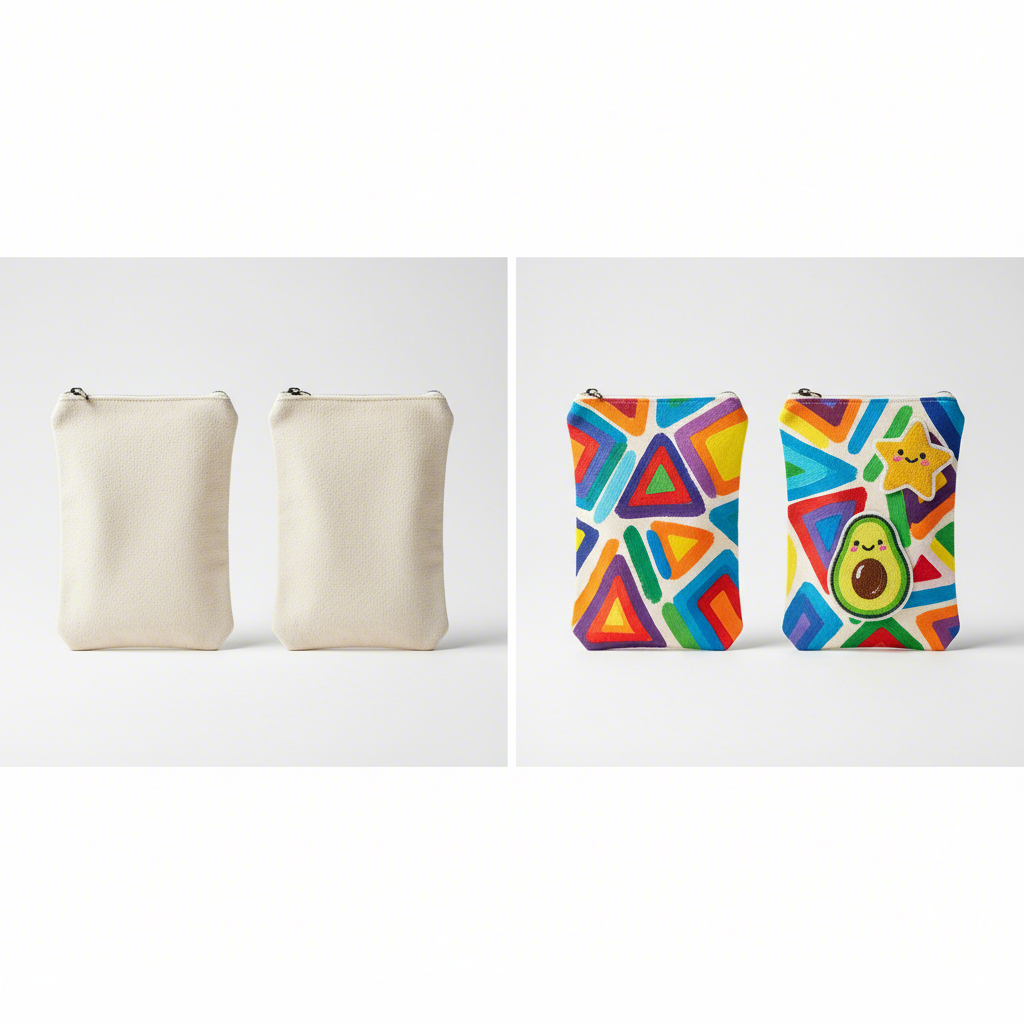
Customizing Your DIY Pencil Pouch
Once you've constructed your no-sew pencil pouch, the real fun begins: personalization! This is your chance to turn a simple craft into something that truly reflects your style. A plain canvas or felt pouch is like a blank slate, ready for you to add color, texture, and personality. Customizing your creation is what makes a DIY project so rewarding, and there are countless easy ways to do it.
Different fabrics are suited for different decoration techniques. For example, smooth-surfaced fabrics like duck cloth or canvas are perfect for painting or iron-on designs, while felt is an excellent base for attaching patches or adding simple decorative stitches. Think about the look you want to achieve and choose a method that complements your fabric and style.
Here are a few ideas to get your creativity flowing:
Iron-On Vinyl: Use a craft cutting machine or pre-made iron-on decals to add names, shapes, or fun designs. This is a quick way to get a clean, professional-looking finish.
Fabric Markers or Paint: Draw your own designs directly onto the fabric. You can create patterns, write your initials, or draw your favorite characters. Be sure to use permanent fabric markers or paints.
Patches and Buttons: Iron-on or glue-on patches are a fun way to add personality. You can also sew on extra decorative buttons for a pop of color and texture.
Tassels and Charms: Add a handmade tassel, a cute charm, or a beaded keychain to the zipper pull for an extra bit of flair.
To apply an iron-on vinyl decal, for instance, you would first cut your design (making sure to mirror the image before cutting). Then, place the decal on your finished pouch, cover it with a thin cloth, and press it with a hot iron according to the vinyl manufacturer's instructions. This simple step can completely transform your pouch from handmade to high-style.
Frequently Asked Questions
1. How to make a homemade pencil pouch?
You can easily make a homemade pencil pouch without sewing by using fabric glue or permanent hem bonding strips. The two main methods involve either attaching a zipper with fabric glue for a secure closure or folding fabric like felt and sealing the edges with bonding strips to create a flap-style pouch with a button.
2. What can I use instead of a pencil pouch?
If you need an alternative to a traditional pencil pouch, several household items work well. A sturdy Ziploc bag, especially a quart-sized one with a slider, is a great waterproof option. You can also use a small tin box (like an old mint tin for smaller items), a makeup bag, or even a simple elastic band to keep a few pens and pencils bundled together.
3. What fabric to use for pencil pouch?
For a durable, long-lasting pencil pouch, it's best to use heavier-weight fabrics. Materials like canvas, duck cloth, denim, and felt are excellent choices because they are sturdy and hold their shape well. Natural fibers like jute or burlap can also be used for a more rustic, textured look.


 Send Email
 售前客服
售前客服